Monday, March 20, 2023

Where I find inspiration. Floribunda scroll.

Not every stencil I cut is traditional Japanese in origin. I was inspired recently to use a wreath design from a woven coverlet. Here is the image. It required some alteration and simplification and editing as I cut to permit a stencil design.  The surrounding detail would have been tricky to cut and it was the wreath I really liked.   


Cutting was easier than you might expect, using an image printed on two sheets of 11x17 tracing paper and a little spray adhesive on this big stencil. Hollow punches of three sizes allowed me to create the center star. 

I chose a dainty Japanese border design stencil to make the finished scroll, dyed with soy based pigment paints on Japanese ramie. The result is fresh, springlike and a little Japanese inspired. I am happy.


Monday, March 13, 2023

I think it is time to revive this blog. My life in katazome has continued to develop in the ten years since I moved on. I will gladly share that as time goes on. But what has gotten me thinking is the realization that I need to organize my collection of old indigo textiles for donation or sale. The impetus for this was a recent class with Carol Ann Grotrian organized by the Columbia Fiber Arts Guild in Portland Oregon (at my request initially). She makes quilts with lovely indigo shibori, hand stitched with variations of  boro mending techniques.

Boro was used to create and repair garments and futon covers from every bit of useable fabric at a time when Japan was not a wealthy country. I purchased several old examples from Ichiroya, an online flea market. Boro examples, like the Gees Bend quilts, have become popular and are sometimes exhibited as abstract art. Here is my futon cover with a lot of old katazome fabrics. The delicate mends are remarkably moving to me. 


I have a couple of garments as well that are really astonishing in their virtuosity The first is a short under kimono with shibori sleeves and amazing katazome fabric in the body. This stencil depicts the shadows of samurai warriors falling on shapes with imitation shibori patterns. Imitating shibori was a fairly common katazome technique to save the labor of actual shibori. But the imagination and skill of this stencil is in a whole different category. 


The final example is a vest, a folk garment but not work wear. Whoever combined the katazome outer layer with the kasuri (ikat) inner layer used stitches so fine that the garment appears to be woven. It boggles my mind. This is the most significant purchase I ever made and I hope to find a museum  collection for it someday. 


The last photo is the start of the project from the recent class. It is a sampler of sorts but it uses a small collection of tidbits salvaged from the inner linings etc. of the kimonos I dismantled to resell to quilters. I saved all of them, mends and all, because discarding them did not respect the intent of the makers. 


Thursday, March 1, 2012

March pleasure


Welcome to March. I have a small treasure to share with you today.
Takeshi Nishijima (1929-2003) was a professor of art at Kyoto University and a graphic and textile designer who exhibited in numerous one man shows and won the coveted Grand Prize at the Kyoto Art Exhibit. He was associated with Haruo Kuriyama of the Wazome Kogei company, which was probably the publisher of his katazome calendars. Kuriyama was also a friend of Keisuke Serizawa, the best known katazome artist, who produced calendars annually beginning in 1946.
The larger folio calendars of both Serizawa and Nishijima were katazome on paper, like my work on fabric. The smaller calendars were wood block or silkscreened from the same designs. I have three little Nishijima calendars from the 1970s, bought at a small gift shop in Corvallis, plus many Serizawa mini calendars and a few folios bought used. After Serizawa died the calendars continued to be made from his designs. The Nishijima calendars were only made for a few years. I love Nishijima’s imagery and would adore finding a folio someday.
The Kuriyama workshop is the very same one I spent several days in when I was in Japan in 2010, the one remaining katazome textile production workshop in Kyoto. What a privilege for me to have been there. 

Sunday, February 12, 2012

Singing the blues

I am selling my fabrics once again this year at the East Bay Heritage Quilters show, Voices in Cloth, March 18-19. The show is in mid March and between that deadline and my solo show going up at Latimer Quilt and Textile Center in Tillamook, OR on March 5, I am running myself pretty ragged. I have decided to diversify my offerings this year rather than relying so much on the quilters indigos so there is a lot of extra work involved getting more one-of-a kind pieces and garment silks ready. Not to mention redesigning my 10 x 10 booth space. This week I finally finished the last batch of indigo pieces.

The first ones are long pieces with several repeats, both traditional stencils that would have been used on futon covers 100 years ago. Sure a lot prettier than mattress ticking,


This big stencil made for pillow tops was one I took from a detail on a really virtuosic Japanese stencil. It was smaller in scale than this 18" square, and irregular in shape so one did not have to match all those stripes every time, unusual since almost all other stencils I had seen were rectangular. I took pieces of this design and cut and pasted and redrew until I had something I could use as a square pillow top stencil. It was a lot of work and cutting and stabilizing those long parallel lines before attaching the silk mesh was challenging.  Those of you who have taken my classes know this is not beginners work! I sold a pair of these pillows at the Japanese Garden last summer and it is time to make a couple more.


I rarely purchase stencils but when I was in Japan the last time I could not resist this one. They told me it says congratulations over and over, but I was fascinated by the variety in the characters.


This is another large stencil which I adapted from a traditional pattern. Images for most kimono fabrics are oriented in both directions, because there is no shoulder seam. I took the elements and inverted them in various combinations to compose a stencil which I have used for multicolored shawls and noren and this time for an indigo panel like this one.


There is a famous woodblock print of a bird on a branch by Hiroshige done in blue and white. I decided to see whether I could adapt it to be cut as a stencil. It was a fun project. Nobody knows what the ancient seal script says anymore. The interesting relationship between block printing and katazome is the subject of an upcoming post.


I usually just print the heron alone but decided this time to make a little composition out if it. So now that these pieces are done the vat is going to go to sleep for awhile so I can use that drying area to stretch silk garment lengths. I will post pictures of them as they accumulate.


Wednesday, January 25, 2012

Out of the deep

Hi all, I am back in the land of the living and more to the point, in the land of the creating, after knee replacement. The final months before the surgery and the recuperation kept me out of the studio but I am on a tear now and eager to resume sharing my art life and knowledge with you all again. I have a Facebook page now and will be posting there as well.

https://www.facebook.com/pages/Nautilus-Fiberarts/219386980331

I cut some stencils this week for an interesting big quilt top. Years ago I made stencils of the big shells of fossil ammonites, extinct relatives of octopus and Chambered Nautilus. These shells are truly gorgeous things and the stencils have been useful for a series of quilts I called Strata.

My art quilt group High Fiber Diet is planning a travelling show called Elements, and our pieces are to be based on earth, air, fire and water. I decided to expand on the Strata theme and work through several geological eras, during the period when invertebrates (as opposed to fish) dominated ancient seas. (For those of you who do not know, my first career was in marine biology and I worked on octopus, as well as some of its relatives, and I have always been crazy about the beauty and diversity of invertebrate animals.

So the new stencils depict some really ancient arthropods called trilobites, some clam-like animals called brachiopods and some crinoids and urchins, relatives of starfish, as well as other shelled creatures that might be found as fossils. I have the big quilt top pasted and ready to dye, although it might be awhile before I finish it, as I have other things in the queue ahead of it.

These are the trilobite stencils. Aren’t they interesting?


Thursday, June 17, 2010

Sizing things up

Today started in the far NW corner of Nebraska, two days out from my first class in Madison. It was a nice state park, with nice lawns and trees. One of the things I have to do before a class is stretch and size the fabric for the students to use. This involves painting two four-yard lengths of washed silk and linen with soy milk and stretching it to dry. I showed you how the Japanese do this with narrow fabric. But with 45-60” wide fabric this is another story. Same principle, just a much larger motor activity.


It was not raining and we thought it would be OK to do it first thing in the morning before we left the campsite. Certainly a much better place for that project than the trailer parks we had been in earlier on the trip. At home this would be fine because mornings are usually calm and the breeze does not pick up until late afternoon. But this is Nebraska and pioneer women went insane because the wind never stopped. It was a little like painting a cross between a sail and a bucking bronco. So I stood there holding my morning tea in one hand and anchoring the fabric with the other so it did not sail off and become a UFO. It twice revealed the structural weakness in my stretching system, but at least it dried fast .

Tuesday, June 8, 2010

return to Kuriyama kobo

I woke Monday to pouring rain and I bravely set off to take two buses to the kobo (workshop) where I was to spend several wonderful days observing and photographing. We had been there in November 2008 on an afternoon tour and there are pictures on the blog archives of that trip. I will just share some details. I have a new respect for the meticulous care they take to produce perfect fabric in every part of the process. Stencils were cared for meticulously as well. Here is Mr. Ohno, the current owner, mending loose pieces on a stencil. They get used hard. But I know from my own experience that a little time spent repairing a stencil saves a lot of time re-cutting it later.

They keep color photocopies of previous fabrics in all the various colorways.


I loved watching this worker applying funori (a kind of seaweed, rather like the sodium alginate we use) and a small amount of soymilk to prepare the fabric for dyeing with acid or direct dyes. The many shinshi make a wonderful clatter as he works the brush back and forth.


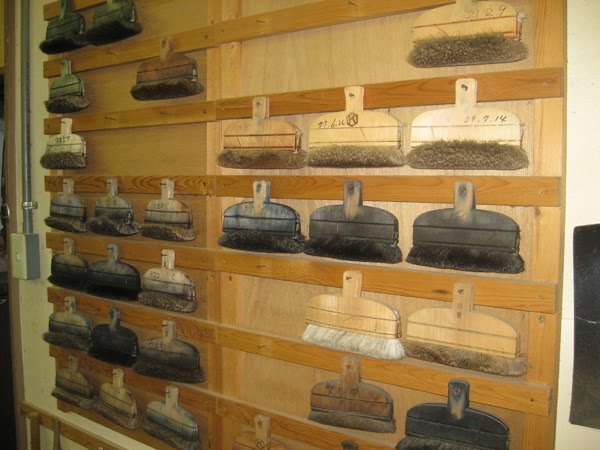
They have a place for everything and everything in its place. Many brushes hang on the wall ready for use and look at all the special sizes of shinshi!


The kobo is located up a narrow stream that flows down into the Kamo river in the middle of Kyoto. A source of fresh water is important for dyeing but the workshops that once polluted the rivers were relocated. The cherry blossoms that overhung the stream were lovely and the water was used to remove paste and purify brushes too.


They were working on summer obis so much of the fabric they were using was hemp, imported from China. I got a kick out of Mr Ohno patiently rolling out long lengths from many rolls at once, trotting back and forth the length of the long work table.


The long stationary table is used for wider fabric like parasol parts.


Most fabrics for obi or kimono are attached to heavy long boards which are held on racks and stored in slots at ceiling height. You have to duck to stand up in the room where the pasting is done. The worker thus does not have to lift the long boards any higher than absolutely necessary.


The youngest worker was a young woman who said she had graduated from art school last year. She did the most tedious work, like washing shinshi to prevent dye transfer and applying cover paste to protect dyed details from over dyes. She spent a lot of time delicately popping what were to me invisible bubbles in this very sticky paste, and then sprinkling it with fine sawdust to reduce the stickiness.


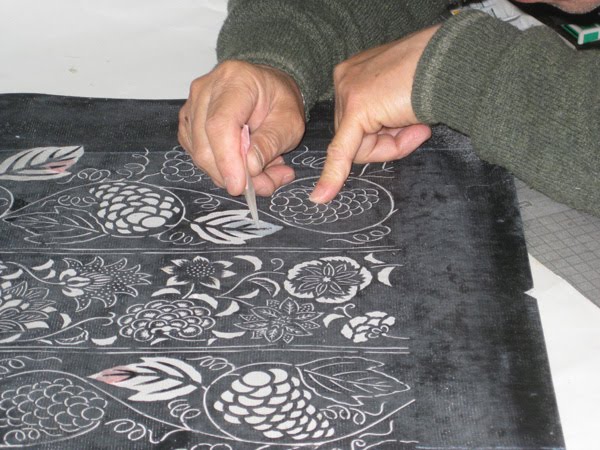
I thought at first that they were cutting corners by dyeing only the parts of the obi that would belong on the front and the knot in back, but apparently this is traditional for nagoya obis, whether dyed or woven. They put an inert pigment in their paste, coloring it blue. I can see that this would make pasting and matching patterns more accurate, especially because they apply two or three layers of paste through thin stencils. And as far as that goes it might make applying dyes more accurate too, but it would take some getting used to from a color standpoint.

The dye kitchen was small and as far as I could determine that work was done only by the son-in-law and heir apparent.

They use open flame burners of various kinds to help the dyes dry more quickly, and humidifiers, to keep the dyes from drying too fast. I am sure the labor safety folks in the US would be horrified at the singed seat cover on the dyer' chair!

The final step after dyeing is to send the fabric out to be steamed to set the dyes, and then it returns to be washed. Sometimes additional dyes are added then and kakishibu is sometimes used to mute and blend the colors.


It then goes back for specialized finishing and steaming to size. They took me to see all that the third day I was there, but it will have to wait for the next post.

Tomorrow we leave on a three month teaching vacation so the next posts will happen when we get internet connections.